List of user groups
What groups are listed?
The User Groups table displays:
- Entra ID groups: These are synced from Entra ID and cannot be edited within ahead. Only Entra groups currently used in Roles (to assign permissions) or in Predefined target audiences are shown.
- ahead ID groups: Created directly in ahead’s user management. All ahead ID groups are listed, regardless of whether they are used in Roles or Predefined target audiences.
Navigating the table
The table includes the following columns:

- Group name: The name of the group. Entra group names are synced; ahead group names are customizable.
-
User count: Number of users in the group.
💡 Tip: Click this number to view the Users tab filtered by that group.
- Roles: Roles connected to the group (can be none, one, or multiple).
- Predefined target audience: Lists any predefined target audiences using this group (can also be none).
- Organization: The source of the group. Either the Entra ID tenant name or “ahead ID” for ahead ID groups.
- In multitenant setups, you may see groups from multiple organizations (e.g. company1.com, company2.de, etc)

- In multitenant setups, you may see groups from multiple organizations (e.g. company1.com, company2.de, etc)
- Edit: Only ahead ID groups can be edited.
Notes:
- Entra ID groups are always linked to at least one role or target audience (that's why they appear in the list).
- ahead ID groups may or may not be connected to any roles or audiences. If they aren’t, consider whether they’re still needed.
Search and filter options
You can:
-
Search by group name
-
Filter by Roles and Organizations
-
Sort the list alphabetically
Group Details Panel
Clicking on a group's row opens a side panel where you can view more details. For ahead ID groups, this panel also allows you to Edit or Delete the group.
Creating an ahead ID user group
To create a new group:
- Go to the User Groups tab and click Add group
- Enter a group name
- Click Save and the group is ready to start adding users to it.

Adding users to ahead ID groups
From the Users Table
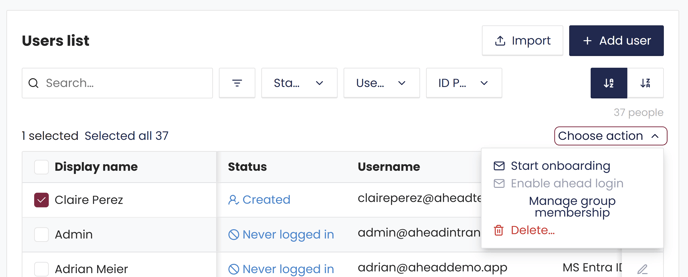
- Go to the Users tab
- Select one or more users (use filters to find ahead ID users).
- Click Choose action > Manage group membership.
- Ensure only ahead ID users are selected (the action is disabled if any Entra users are included).
- In the modal, choose which group(s) to add users to.
-
- You can also remove them from groups. Only common groups among selected users will be shown.

- You can also remove them from groups. Only common groups among selected users will be shown.
From the User's Side Panel
-
Click on a user's row to open their side panel.
-
Choose Choose action > Manage group membership to assign them to one or more groups.

When Creating a New ahead ID User
During user creation, select one or more groups in the Group membership field.

Adding Entra users to groups
This must be done within Entra. ahead can display Entra groups but cannot manage their memberships.
Deleting and ahead ID group
To delete a group:
-
Click on the group’s row to open the side panel.
-
Click Delete.
You can only delete groups that are not connected to any roles or target audiences.
Which Users Are in a User Group?
If you need to see which users belong to a specific group, there are two main ways to do it:
From the User groups tab
Click on the number in the User Count column to see a filtered list of users in that group (works for both Entra and ahead ID groups).

By filtering the Users tab
Use the Groups filter to view users in one or more selected groups.
