Why use automated enrollment?
In some cases, you want participants to be automatically enrolled in a course instead of manually adding them one by one. Common examples include:
-
An onboarding course for new employees
-
A compliance training that all managers must complete
-
Department-specific training (e.g., only Marketing employees)
With Auto Enrollment, you can create rules that assign courses to the right people. These rules are based on user properties (such as department, role or location) or predefined groups.
Auto enrollment works alongside manual enrollment.
How to create and activate an auto enrollment rule
-
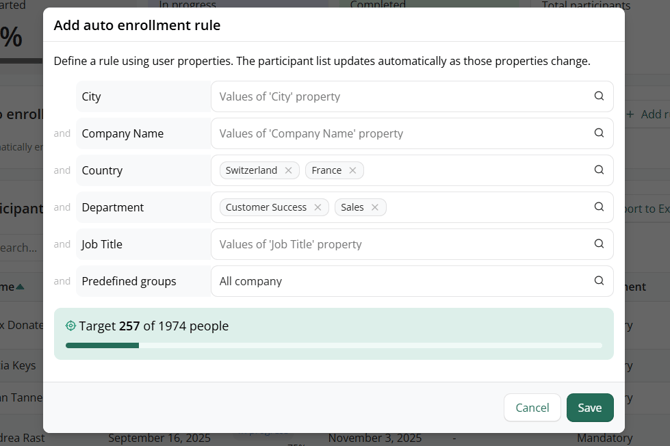
Go to the Participants tab of the course and click on 'Add rule'

-
Define the rule using user properties or predefined groups (similar to targeting News). You’ll see the number of people currently matching the rule.
-
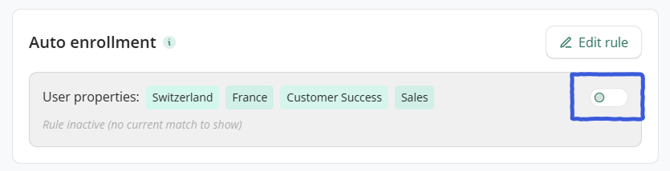
Click Save. The rule is saved but not active yet. Toggle the switch to activate the rule.
-
Confirm activation. All current and future users who match the rule will be automatically enrolled and notified.
Note: Users are enrolled only if the course is published. If it’s still in draft, enrollment will happen once the course is published
⚠️ Important: Users must have the 'Access courses' permission to be enrolled. The “people count” displayed in the rule includes all users who match and have the required permission.
If the number seems low, head to the 'User Management' area and make sure all necessary people have the permission assigned.
Synchronization cycles
Auto enrollment rules run on a daily synchronization cycle (around 4:30 AM CET).
-
Example: If a rule targets
Department = Marketingand a new employee is added to Marketing at 10 AM, they will be enrolled during the next cycle at 4:30 AM.
Immediate synchronization
There are some cases where synchronization happens instantly:
-
When you activate a rule for the first time
-
When you toggle a rule off and on again (even without editing it)
- When the rule is active and you edit it (by adding or removing properties)
Tip: If you don’t want to wait for the daily cycle, simply switch the rule off and back on. Matching users will be enrolled immediately.
Alternatively, you can use the Enroll participants button to add them manually.
Checking currently matched users
Once a rule is active:
-
You’ll see the selected properties and the number of users currently matching the rule.

-
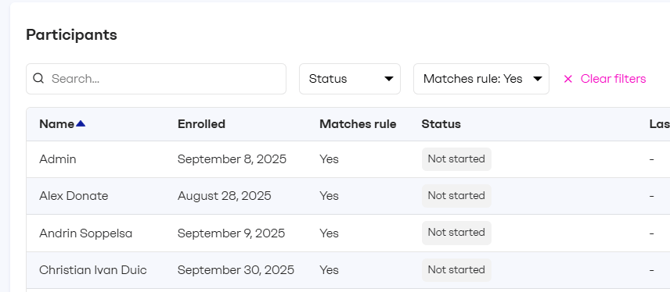
Click Filter current match to view those users.
-
The participants list will filter to show only matching users, with an extra column “Matches rule.”
Why the number of matching users doesn’t match the filtered list
The rule count includes all users with the Access Learning permission who match the defined properties.
However, for a user to actually be enrolled (and appear in the Participants list), they must have already onboarded to the intranet — meaning they’ve logged in at least once. These users will be automatically enrolled as soon as they onboard to the intranet.
You can check a user’s onboarding status by visiting their profile:
-
If they have not onboarded, their profile will display the message: “Has never logged in to ahead yet.”

Excluding users from a rule
Sometimes you may want to exclude specific users who would otherwise be enrolled.
Example: A course is for Country = Spain, but you don’t want the Country Manager to be included.
To exclude a user:
-
Create and activate the rule.
-
Go to the participants list and find the user.
-
Click the More button → Exclude from rule.

- Then click Remove participant.

⚠️ Important: Exclusion is a two-step process. If you only remove the participant but don’t exclude them, they will be re-enrolled at the next synchronization cycle.
Managing excluded users
- In the Auto Enrollment section, click on Excluded users (right side).
- You’ll see the list of excluded participants. Click on 'Remove' to remove the exclusion for a user at any time.
